You've written a great piece of content. The research is solid, the writing is sharp, and the target keyword is spot on. Then you hit publish — and nothing happens. No traffic. No rankings. No movement.
The problem isn't your content. It's the technical foundation underneath it.
Studies show that over 40% of websites have critical crawlability issues that prevent search engines from ever properly evaluating their pages. No matter how good your content is, if Google can't efficiently crawl, index, and render your site, those pages won't rank.
That's where a proper technical SEO checklist comes in. Think of it as your pre-flight checklist before every piece of content goes live — a systematic review of the infrastructure that either empowers or blocks your SEO efforts.
This guide covers all 20 essential technical SEO items you should verify before publishing, organized by category so you can work through them efficiently. Whether you're doing a one-off audit or building a repeatable publishing workflow, this is the checklist you need.
What Is Technical SEO? (Quick Overview)
Technical SEO refers to the process of optimizing your website's backend infrastructure so that search engines can efficiently crawl, render, and index your content.
While on-page SEO focuses on the content itself — headings, keywords, and structure — technical SEO focuses on the plumbing: site speed, crawlability, URL structure, mobile performance, and the signals that tell search engines how to interpret your pages.
The distinction matters because technical SEO issues operate silently. A broken canonical tag, an accidental noindex directive, or a 6-second page load won't trigger an error message in your CMS. But they will quietly suppress your rankings, often for months, until someone runs an actual technical SEO audit.
The good news: most technical SEO issues are fixable. Once you know the checklist, you can audit a page in under 30 minutes. For help with on-page SEO elements, that's a separate — but equally important — layer to review alongside the technical factors below.
Crawlability & Indexing Checklist (Items 1–5)
Crawlability is the foundation. Search engines can't rank what they can't find. Before anything else, confirm that Google has a clear, unobstructed path to every page that matters.
1. Verify Your robots.txt File Isn't Blocking Important Pages
Your robots.txt file tells search engine crawlers which sections of your site to visit and which to skip. A misconfigured robots.txt is one of the most common — and most damaging — technical SEO mistakes.
What to check:
- Open
yourdomain.com/robots.txtand review the Disallow rules - Confirm no important page directories (e.g.,
/blog/,/services/) are accidentally blocked - Add a reference to your XML sitemap at the bottom:
Sitemap: https://yourdomain.com/sitemap.xml - Use Google Search Console's robots.txt Tester to validate the file
A Disallow: / rule blocks your entire site from Google. It's rare, but it happens — usually during site migrations when a staging environment setting carries over to production.
2. Submit and Validate Your XML Sitemap
An XML sitemap is your site directory — it tells search engines which URLs exist and which are the most important. Without one, Google relies entirely on link discovery, which means orphaned pages or newly published content may never get crawled.
What to check:
- Confirm a sitemap exists at
yourdomain.com/sitemap.xml(orsitemap_index.xml) - Submit the sitemap in Google Search Console under Sitemaps
- Ensure the sitemap only includes indexable pages (no noindex URLs, no 404s, no redirects)
- Check the sitemap is referenced in your robots.txt file
- Verify the sitemap is updated automatically when you publish new content
Most CMS platforms (WordPress with Yoast/RankMath, Shopify, Squarespace) generate sitemaps automatically. The issue is usually that they include the wrong pages.
3. Check for Accidental noindex Tags
A noindex directive tells Google to exclude a page from search results entirely. This is sometimes intentional (thank-you pages, admin pages, login pages) — but far too often it's applied by mistake.
What to check:
- Use Google Search Console's URL Inspection tool on key pages
- Check each page's HTML
<head>for:<meta name="robots" content="noindex"> - Review your SEO plugin settings — many CMS plugins let you bulk-noindex entire categories or post types
- In GSC, filter the Coverage report for "Submitted URL marked 'noindex'"
If a page should rank but GSC shows it as noindex, remove the tag and request indexing. Google will recrawl and re-evaluate it.
4. Fix Crawl Errors and Broken Links
Broken links (404 errors) waste your crawl budget and create a poor user experience. Google Search Console reports them under Coverage → Not Found (404). Every broken internal link is a dead end for both users and search engine bots.
What to check:
- Run a site crawl with Screaming Frog SEO Spider (free up to 500 URLs) to identify all internal 404 errors
- Check GSC Coverage report for server errors (5xx) and redirect errors (3xx loops)
- Fix broken links by either updating the URL, redirecting to an active page, or removing the link entirely
- Audit your most valuable external backlinks — if inbound links point to 404 pages, create 301 redirects
A clean crawl with no broken links signals to Google that your site is well-maintained and technically sound.
5. Eliminate Orphaned Pages
An orphaned page has no internal links pointing to it. If Google's crawler enters your site through the homepage and follows links, it will never find an orphaned page — even if the page is in your sitemap.
What to check:
- Use Screaming Frog's crawl data to find pages with zero internal links pointing to them
- Identify valuable content (guides, landing pages, blog posts) that's "floating" without contextual links from other pages
- Add relevant internal links from related content to these orphaned pages
- For new pages, make sure at least 2–3 existing pages link to them before publishing
A logical site hierarchy — Home → Category → Post — makes crawling efficient and ensures every page is reachable.
Site Speed & Core Web Vitals Checklist (Items 6–10)
Google uses Core Web Vitals as a ranking signal. These are measurable, user-centric performance metrics. Passing them doesn't just help SEO — it directly improves the experience for every visitor to your site.
The three current Core Web Vitals are:
- LCP (Largest Contentful Paint): How fast the main content loads. Target: under 2.5 seconds.
- CLS (Cumulative Layout Shift): How much the layout shifts during load. Target: under 0.1.
- INP (Interaction to Next Paint): How quickly the page responds to user interactions. This replaced FID in 2024.
6. Measure and Improve LCP (Largest Contentful Paint)
LCP is typically driven by your hero image, main heading, or above-the-fold video. An LCP above 4 seconds is rated "Poor" by Google.
What to check:
- Run Google PageSpeed Insights on your key pages
- Images are the LCP element on more than 50% of websites — optimize aggressively
- Convert images to WebP format (25–35% smaller than JPEG for photographs)
- Add
fetchpriority="high"to your LCP image to tell browsers to load it first - Use
srcsetto serve appropriately sized images for mobile vs. desktop - Minimize render-blocking CSS/JavaScript above the fold
7. Fix CLS (Cumulative Layout Shift) Issues
CLS happens when elements load and push other content around — the classic "I was about to click that link and it moved" frustration. A CLS score above 0.25 is rated "Poor."
What to check:
- Always define explicit
widthandheightattributes on<img>elements to reserve space - Use
position: fixedfor banners and notification bars so they don't push page content - Avoid inserting content (ads, popups, dynamic elements) above existing content after page load
- Use
font-display: swapto prevent invisible text during font loading - Test using Google Search Console's Core Web Vitals report, which shows real-user data
8. Optimize INP (Interaction to Next Paint)
INP measures how long it takes for a page to visually respond after a user clicks, taps, or types. A good INP is under 200 milliseconds. Unlike the old FID metric, INP captures all interactions — not just the first one.
What to check:
- Minimize long JavaScript tasks that block the main thread
- Defer non-critical JavaScript: add
deferorasyncattributes where appropriate - Break up heavy JS operations with
requestIdleCallbackorsetTimeoutfor non-urgent work - Use Chrome DevTools Performance panel to identify slow interactions
- Consider a JavaScript performance audit if your INP is consistently above 500ms
9. Enable Compression and Caching
Server-level performance optimizations have a measurable impact on page speed for every visitor, every time.
What to check:
- Enable GZIP or Brotli compression on your server to reduce the size of HTML, CSS, and JS files
- Set browser caching headers (Cache-Control) so returning visitors load cached files instead of re-downloading everything
- Use a Content Delivery Network (CDN) to serve assets from servers geographically close to your visitors
- For WordPress, plugins like WP Rocket, W3 Total Cache, or LiteSpeed Cache handle most of this automatically
- Verify compression is active using Google PageSpeed Insights — it flags missing compression as an opportunity
10. Optimize Images for Speed and Web Standards
Images are frequently the heaviest assets on a page and the single biggest opportunity for speed improvement.
What to check:
- Compress all images using tools like TinyPNG, Squoosh, or ImageOptim (20–40% size reduction with no visible quality loss)
- Serve next-gen formats: WebP for photos, SVG for icons and logos
- Add
loading="lazy"to all images below the fold — this defers loading until the user scrolls near them - Never upload images larger than what your layout displays (a 3,800×2,200px image for a 800px-wide container is massive waste)
- Set explicit width and height on every image to prevent CLS
URL Structure & Architecture Checklist (Items 11–14)
Clean URLs aren't just user-friendly — they help search engines understand your content hierarchy and index your pages more efficiently.
11. Use Clean, Keyword-Rich URL Slugs
A URL slug should tell both users and search engines exactly what a page is about, at a glance.
What to check:
- Use lowercase letters and hyphens to separate words (no underscores, no spaces, no special characters)
- Include your primary target keyword in the slug — e.g.,
/blog/technical-seo-checklist - Keep slugs short and descriptive — aim for 3–5 words maximum
- Remove stop words (and, or, of, the) unless they're essential for readability
- Never include dates or numbers in slugs if you plan to update the content later (changing a slug breaks inbound links)
12. Implement Proper 301 Redirects
When you move or rename pages, 301 redirects preserve the SEO equity of the old URL by permanently directing traffic and ranking signals to the new location.
What to check:
- Audit your site for any page that has moved without a redirect in place
- Use 301 (permanent) redirects for all content moves — not 302 (temporary) redirects
- Check for redirect chains (A → B → C → D) — these dilute link equity and slow page load; collapse them to direct 301s
- Verify redirects are working using a browser extension like Redirect Path or a redirect checker tool
- For site migrations, build a full redirect map before the launch date
13. Resolve Duplicate Content with Canonical Tags
Duplicate content confuses Google about which version of a page to rank. This happens more often than you'd think — www vs. non-www, HTTP vs. HTTPS, trailing slash vs. no trailing slash, filtered URL parameters, and syndicated content all create duplicate URL variants.
What to check:
- Add a
rel="canonical"tag to every page pointing to its preferred (canonical) URL - For e-commerce or sites with URL parameters, canonicalize filtered/sorted versions to the main category URL
- Verify that
yourdomain.comandwww.yourdomain.comresolve to one consistent version (use a 301, not just canonical) - Check that paginated pages (/page/2/, /page/3/) have canonical tags correctly configured
- Use Google's URL Inspection tool to see which canonical URL Google has selected for a given page
Google's John Mueller confirmed that correct canonical implementation helps search engines crawl your site more efficiently and consolidates ranking signals to your preferred URLs.
14. Enforce HTTPS Across Your Entire Site
Google confirmed HTTPS as a ranking signal back in 2014. In 2026, an HTTP website doesn't just have a minor SEO disadvantage — it actively damages user trust, with browsers displaying "Not Secure" warnings that cause visitors to leave.
What to check:
- Confirm your SSL certificate is valid and not expired (check the padlock icon in your browser's address bar)
- Ensure all HTTP URLs are permanently redirected (301) to their HTTPS equivalents
- Check for mixed content warnings — pages loaded over HTTPS that include HTTP resources (images, scripts, stylesheets) undermine security and trigger browser warnings
- Use a tool like SSL Labs' SSL Test to score your SSL configuration
- Set your preferred HTTPS version as canonical and in Google Search Console
On-Page Technical Elements Checklist (Items 15–18)
These items sit at the intersection of technical SEO and content optimization — they're implemented in the code, but they directly affect how your pages are understood and presented in search results.
15. Optimize Title Tags for Every Page
Your title tag is the single most visible on-page SEO element in search results. It's the blue clickable headline in every SERP listing.
What to check:
- Keep title tags between 50–60 characters to avoid truncation in search results
- Include your primary keyword naturally — ideally near the beginning of the title
- Every page should have a unique title tag — duplicate titles confuse search engines about page differentiation
- Avoid keyword stuffing: "Cheap SEO Cheap SEO Services Cheap SEO Company" is a red flag
- Include your brand name at the end for branded searches:
Technical SEO Checklist | Allable.ai
16. Write Compelling Meta Descriptions
Meta descriptions don't directly affect rankings — but they do directly affect click-through rates, which drives more organic traffic.
What to check:
- Keep meta descriptions between 120–155 characters
- Include your primary keyword (Google may bold it in search results when it matches the user's query)
- Write it like ad copy: make it compelling, specific, and benefit-driven
- Every page should have a unique meta description — avoid leaving them blank (Google will generate one, often poorly)
- Use a first-person or second-person voice: "Learn how to..." or "Discover the 20 technical SEO fixes..."
17. Audit Your Mobile Experience
Google uses mobile-first indexing, meaning the mobile version of your site is what Google uses to determine rankings. As of 2026, more than 65% of global organic searches happen on mobile devices.
What to check:
- Use Google's Mobile-Friendly Test tool (in Google Search Console, URL Inspection) to check each key page
- Ensure your site uses responsive design — layouts that adapt fluidly to any screen size
- Check that all text is readable without zooming (minimum 16px body font size)
- Buttons and tap targets must be large enough for thumbs — at least 48×48 CSS pixels with adequate spacing
- Confirm your mobile version contains the same content as desktop — with mobile-first indexing, hidden mobile content is invisible to Google
18. Optimize Internal Linking Structure
Internal links distribute PageRank across your site and help search engines understand the hierarchy and relationships between your pages.
What to check:
- Every new page should receive at least 2–3 internal links from related, existing content
- Use descriptive anchor text that reflects the target page's topic (avoid "click here" or "read more")
- Link from high-authority pages (pillar content, homepage) to pages you want to rank
- Avoid deep linking — important content shouldn't require more than 3 clicks to reach from the homepage
- Periodically audit for broken internal links and orphaned pages (covered in Item 5)
Schema Markup & Structured Data Checklist (Items 19–20)
Schema markup — also called structured data — is code you add to your pages that helps search engines understand the meaning and context of your content. In 2026, it's increasingly critical for rich results and visibility in Google's AI-powered features.
19. Implement Relevant Schema Types for Your Content
Different types of content benefit from different schema types. Pages with correct schema markup are eligible for rich results that stand out visually in the SERP and often earn significantly higher click-through rates.
What to check:
- Blog posts and articles: Add
ArticleorBlogPostingschema withheadline,datePublished,author, andimage - FAQ pages and content with Q&A sections: Add
FAQPageschema — pages with FAQPage schema are significantly more likely to appear in Google AI Overviews - Products:
Productschema with price, availability, and reviews - Local businesses:
LocalBusinessschema with address, phone, hours, and geo-coordinates - How-to guides:
HowToschema to potentially earn step-by-step rich results
Use Google's Schema.org as the authoritative reference for all schema types and required properties.
20. Validate Your Schema with Google's Rich Results Test
Adding schema is only half the job. Invalid, malformed, or incomplete schema won't earn rich results — and may even cause errors in Google Search Console.
What to check:
- Run every key page through Google's Rich Results Test to verify schema is valid
- Check Google Search Console under Enhancements for structured data errors and warnings
- Look for required fields: missing
name,image,datePublished, orauthorfields are common schema errors - Test after any site updates — CMS updates and theme changes sometimes strip structured data
- For FAQPage schema: ensure the questions and answers in your schema match the actual content on the page (Google can penalize misleading schema)
Schema markup is sometimes treated as optional in SEO audits. In 2026 and beyond, as Google's AI Overviews and enhanced search features rely more heavily on structured signals, it's not optional.
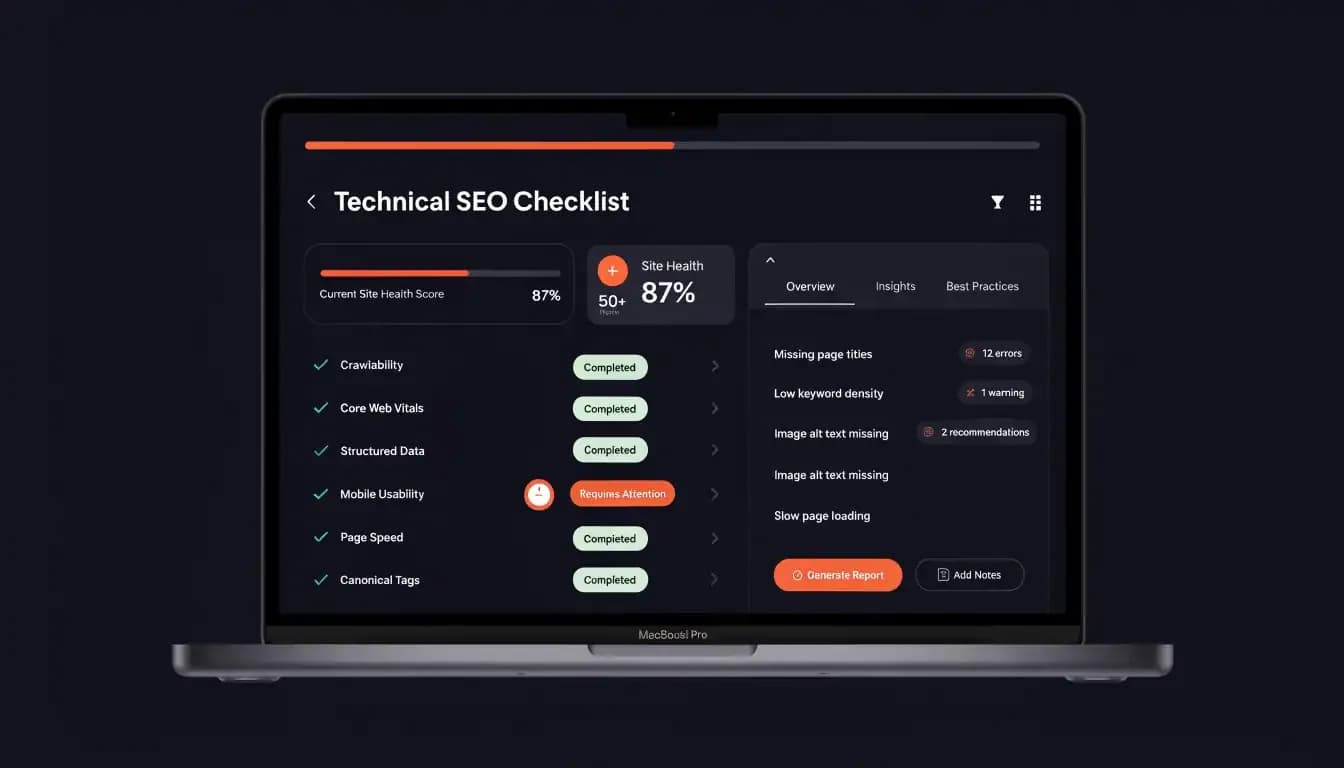
How to Run a Technical SEO Audit with AI
Working through a manual 20-item technical SEO audit checklist is valuable — but it's also time-consuming, and easy to miss things when you're auditing dozens of pages at scale.
This is where AI-powered SEO tools change the equation. Rather than manually checking each item across every page, an AI audit tool can crawl your entire site, flag issues by severity, and generate a prioritized action plan — in minutes.
Allable.ai's SEO Audit feature does exactly this. Connect your site, run a scan, and get an actionable report that covers crawlability issues, Core Web Vitals status, broken links, missing meta tags, schema errors, and more — without manually checking each page one by one.
It also integrates with your keyword research workflow, so you can see not just what's broken, but what's holding back specific target keywords. For an overview of how AI is reshaping the way we approach search optimization, check out our guide on what AI SEO actually means in practice.
The right workflow for this technical SEO checklist:
- Run an AI-powered audit to surface all issues across your site at once
- Prioritize by severity: crawlability issues first, then Core Web Vitals, then on-page elements
- Fix critical errors (broken pages, noindex tags, missing canonical tags) before touching lower-priority items
- Re-run the audit to confirm fixes are in place
- Make technical SEO review a recurring step in your content publishing workflow
Run your free SEO audit on Allable.ai →
Frequently Asked Questions About Technical SEO
What's the difference between a technical SEO audit and an on-page SEO audit?
A technical SEO audit focuses on site infrastructure: crawlability, indexation, page speed, URL structure, HTTPS, and structured data. An on-page SEO audit evaluates the content itself: headings, keyword usage, content depth, and internal linking. Both are necessary — think of technical SEO as the foundation, and on-page SEO as what you build on top of it. For a complete on-page checklist, see our on-page SEO guide.
How often should I run a technical SEO audit?
For most sites, a thorough technical audit every 3–6 months is sufficient. However, you should also audit after any major change: a site migration, a new CMS, a design update, or a significant drop in organic traffic. For large or frequently updated sites (e-commerce, news), monthly automated monitoring is worth setting up.
What tools do I need for a technical SEO audit?
The core free toolkit: Google Search Console (indexation, crawl errors, Core Web Vitals), Google PageSpeed Insights (page speed and Core Web Vitals per URL), and Google's Rich Results Test (schema validation). For a full site crawl, Screaming Frog SEO Spider is the industry standard (free up to 500 URLs). AI platforms like Allable.ai can automate the audit process and provide prioritized recommendations in a single report.
Does HTTPS really affect SEO rankings?
Yes. Google confirmed HTTPS as a ranking signal in 2014, and it remains a component of the Page Experience ranking system. More practically: browsers now flag HTTP sites with "Not Secure" warnings, which drives up bounce rates — a behavior signal that indirectly hurts SEO. Every site in 2026 should be on HTTPS.
What are the most common technical SEO mistakes?
The most common issues found in technical SEO audits are: (1) Broken internal links and 404 errors draining crawl budget, (2) Accidental noindex tags on pages that should rank, (3) Missing or misconfigured canonical tags causing duplicate content, (4) Slow page speed failing Core Web Vitals thresholds, and (5) Missing schema markup leaving rich result eligibility on the table. This technical SEO checklist covers all five.
Conclusion: Make Technical SEO Part of Your Publishing Workflow
A technical SEO checklist isn't a one-time project — it's a discipline. Every piece of content you publish should pass through a technical review, just like it passes through an editorial review.
The 20 items in this technical SEO audit checklist aren't complicated, but they compound. A clean robots.txt plus a validated sitemap plus correct canonical tags plus passing Core Web Vitals plus proper schema — that's the technical foundation that lets your content actually reach the audience it deserves.
Start with the crawlability section. Fix any indexing issues first. Then work through page speed, URL architecture, and on-page elements. Add schema last — once you have a clean, crawlable, fast site, structured data is the finishing layer that maximizes your visibility.
And if you'd rather not audit manually page by page, Allable.ai's SEO Audit tool can scan your site, flag every issue on this checklist, and deliver a prioritized action report — so you can spend your time fixing problems instead of finding them.